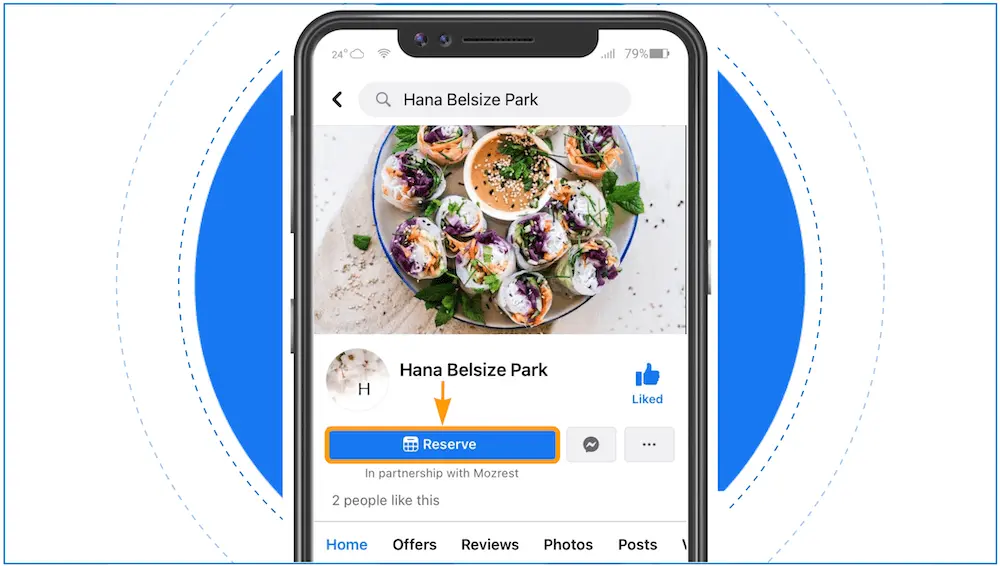
How to add the ‘Reserve’ Button to your Facebook account, 3 step-by-step guides to adding a booking button to Facebook in just a few clicks.
Discover how to add a reservation button to your Facebook page
Restaurants can receive bookings from Facebook directly into their existing reservation management software with Mozrest. But how do you add a booking button to Facebook?
The process is fast and simple. Follow these steps and your restaurant will be bookable on Facebook in just a few seconds.
If your Facebook and Instagram accounts are linked, then the ‘Reserve’ button will automatically be added to your restaurant’s Instagram profile when you add it to your restaurant’s Facebook page. If your Facebook and Instagram accounts are not linked, read this guide to know how to add the ‘Reserve’ Button to Instagram.
3 ways to add the ‘Reserve’ Button to Facebook
You can add a ‘Reserve’ button to Facebook from your:
- Channel Management Hub (10 steps)
- Restaurant’s Facebook page (12 steps)
- Meta Business Suite (12 steps)
Guide #1 – From your Channel Management Hub (10 steps)
Step 1
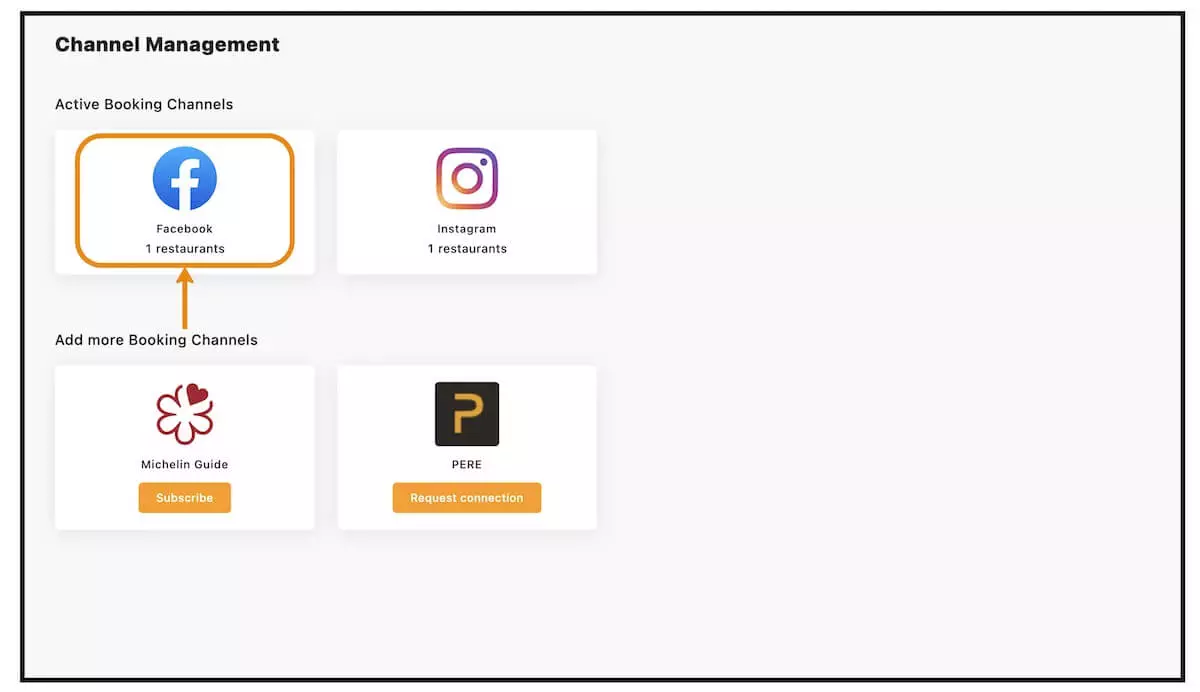
From the ‘Channel Management’ page, click ‘Facebook’.

Step 2
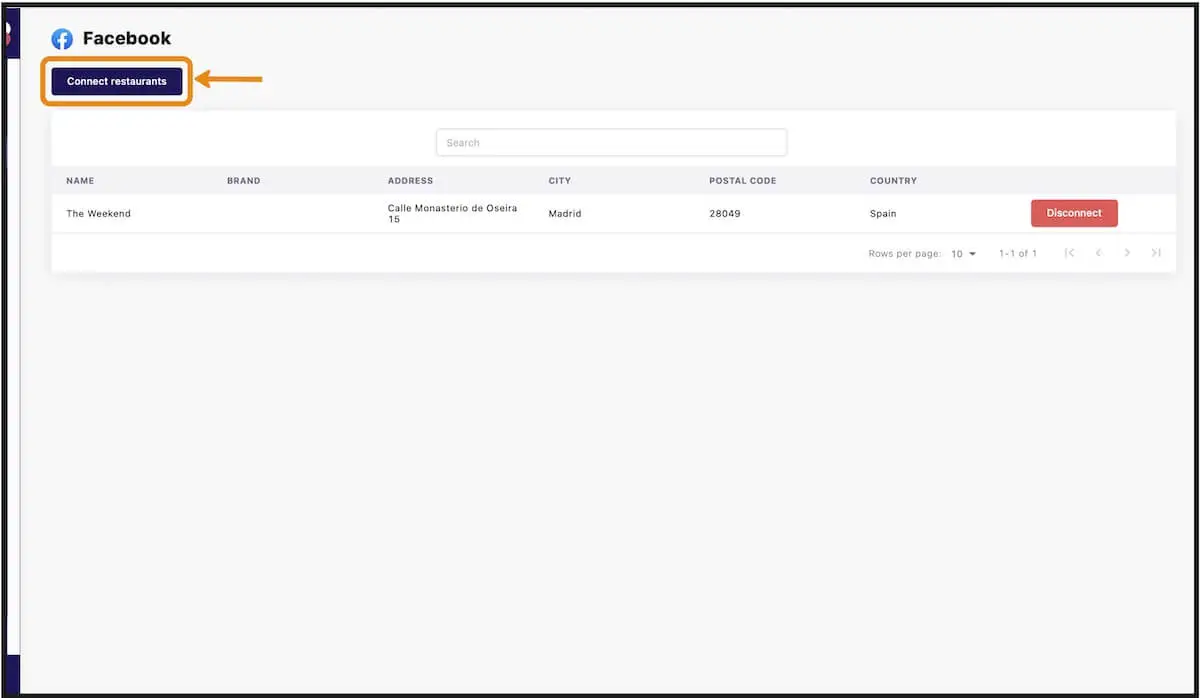
Click on ‘Connect Restaurants’ to add the ‘Reserve’ button to the Facebook page of one or more restaurants.

Step 3
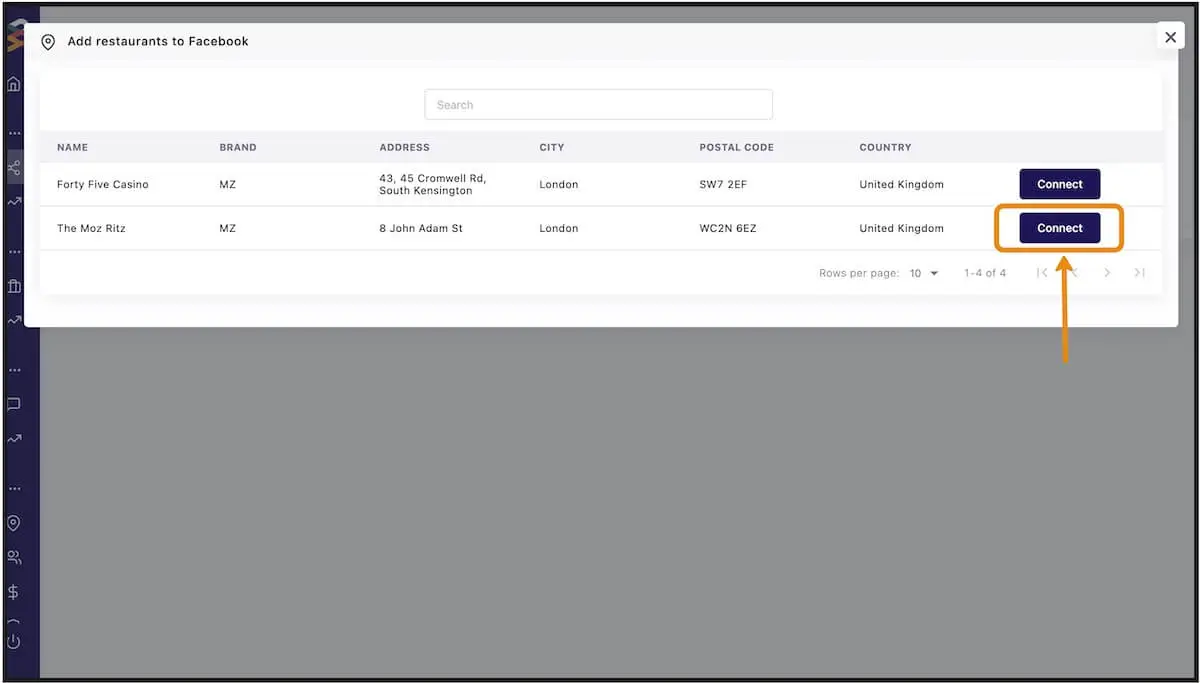
Click ‘Connect’ on the restaurant you want to receive bookings from Facebook.

Step 4
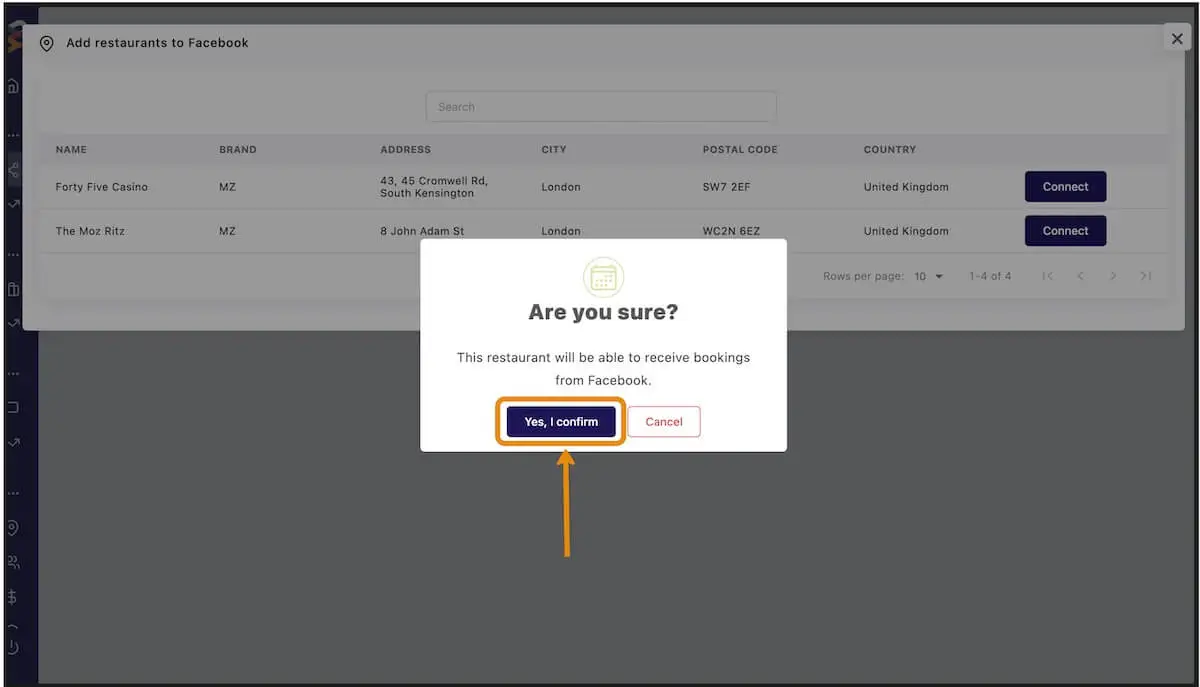
Confirm.

Step 5
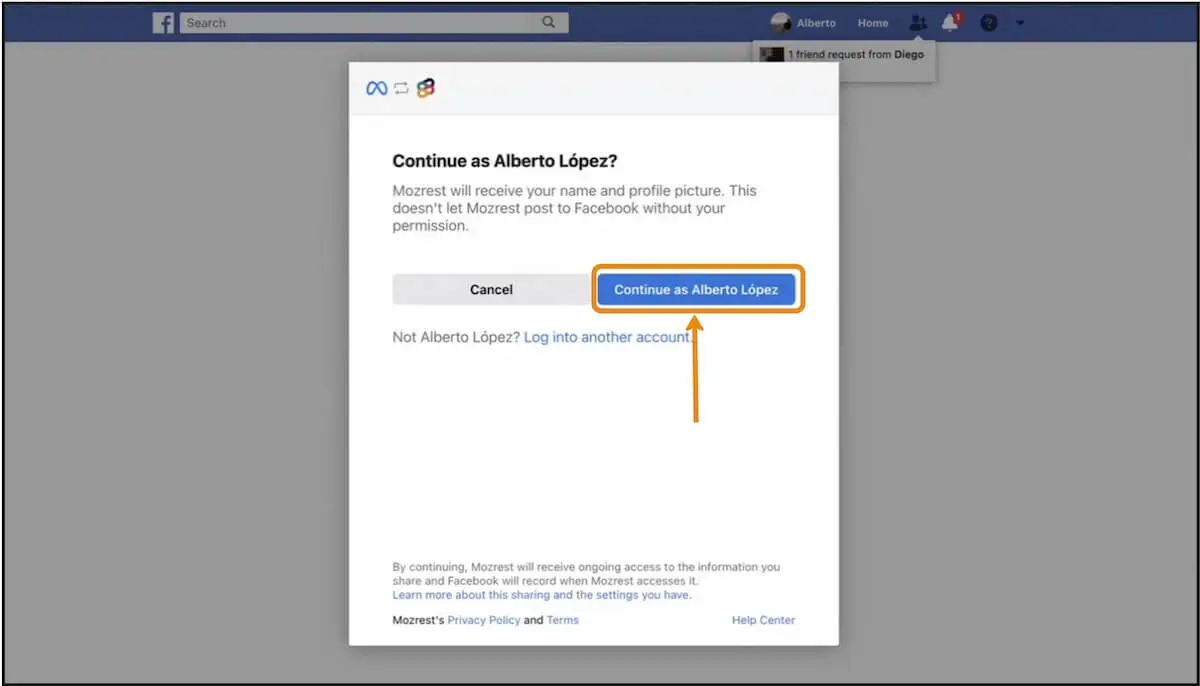
Choose the Facebook account which manages the restaurant page. Click on ‘Continue’.

Step 6
Click on ‘Continue’ to grant necessary permissions to Mozrest.
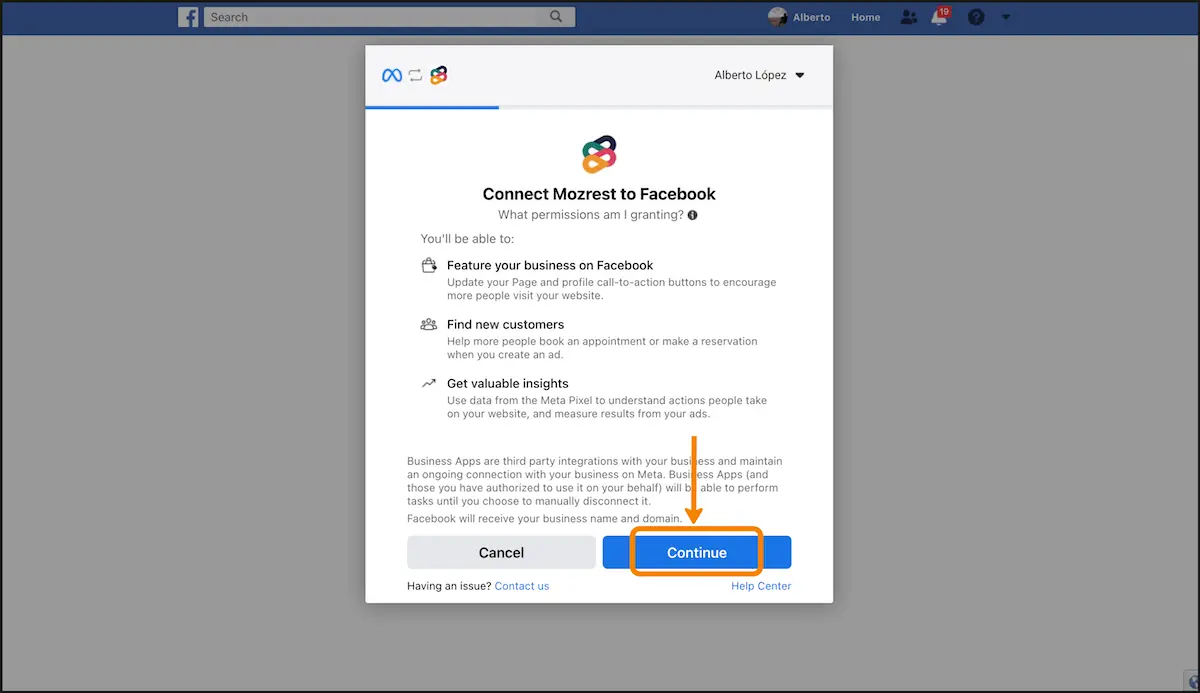

Step 7
Click ‘Continue’ to confirm the settings.
| Notes | Click ‘Add profile’ and check step 7.2 (at the end of this section) if you want to add the ‘Reserve’ button to your Instagram profile too. Check steps 7.1 to 7.4 if you manage multiple Facebook accounts and want to select another one.
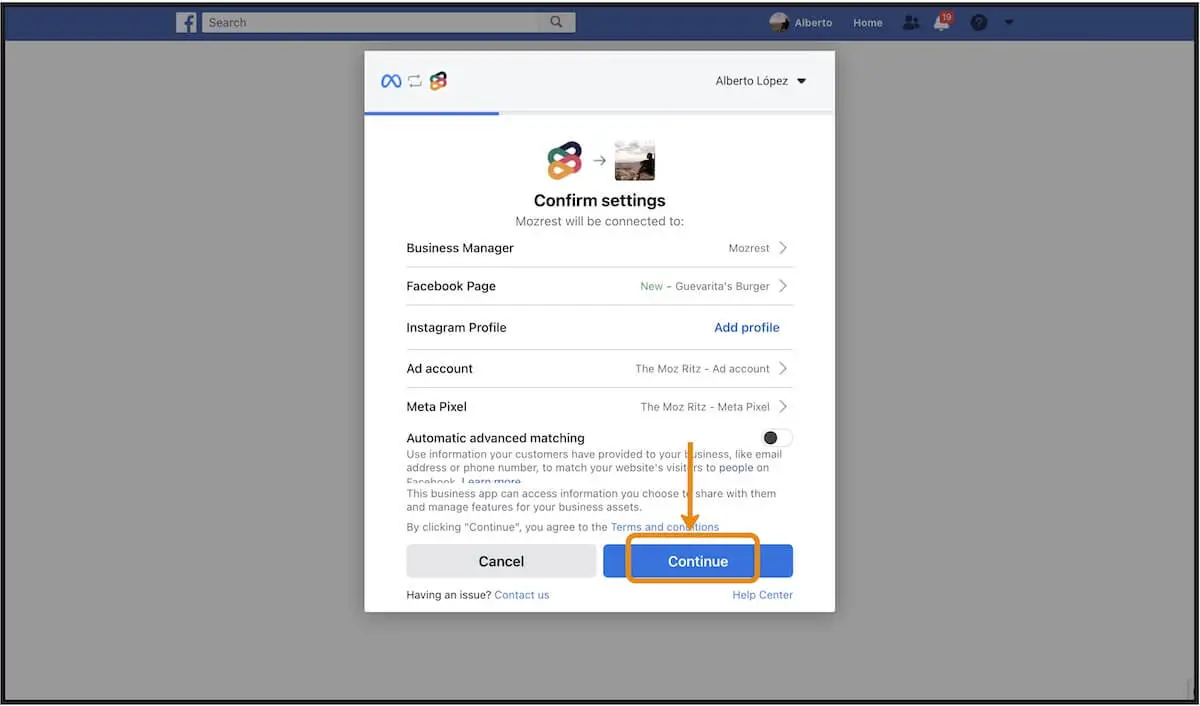

Step 8
Click ‘Next’ to complete Mozrest integration with the Facebook account.
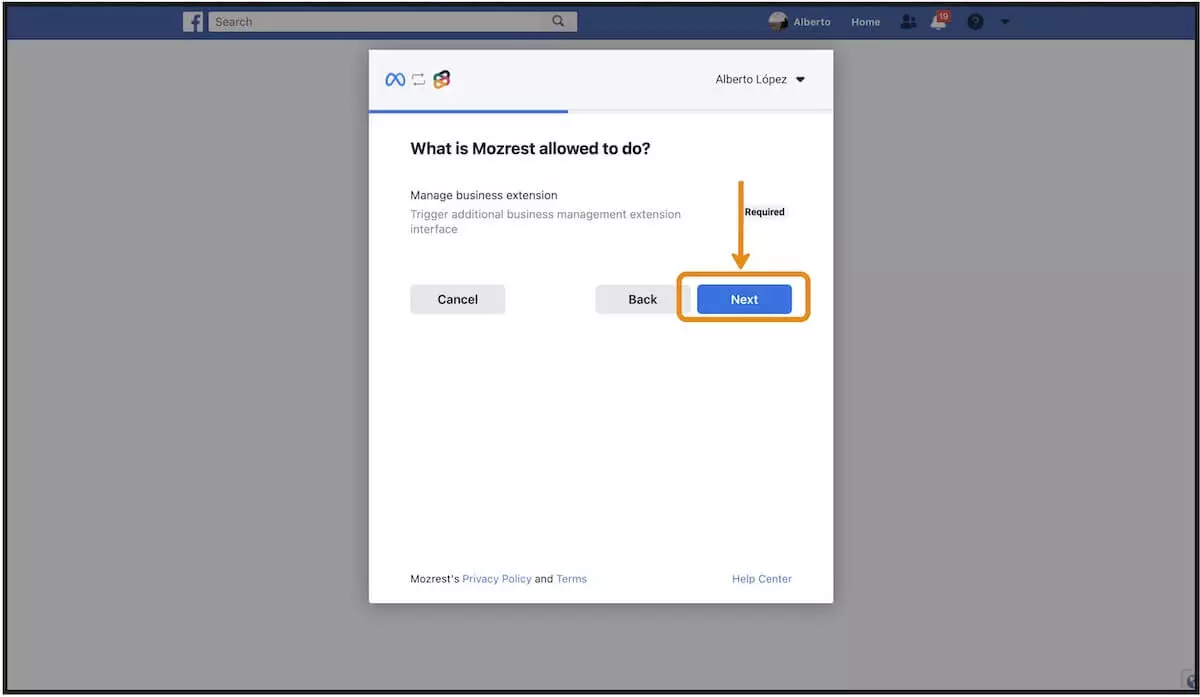

Step 9
Click ‘Done’.
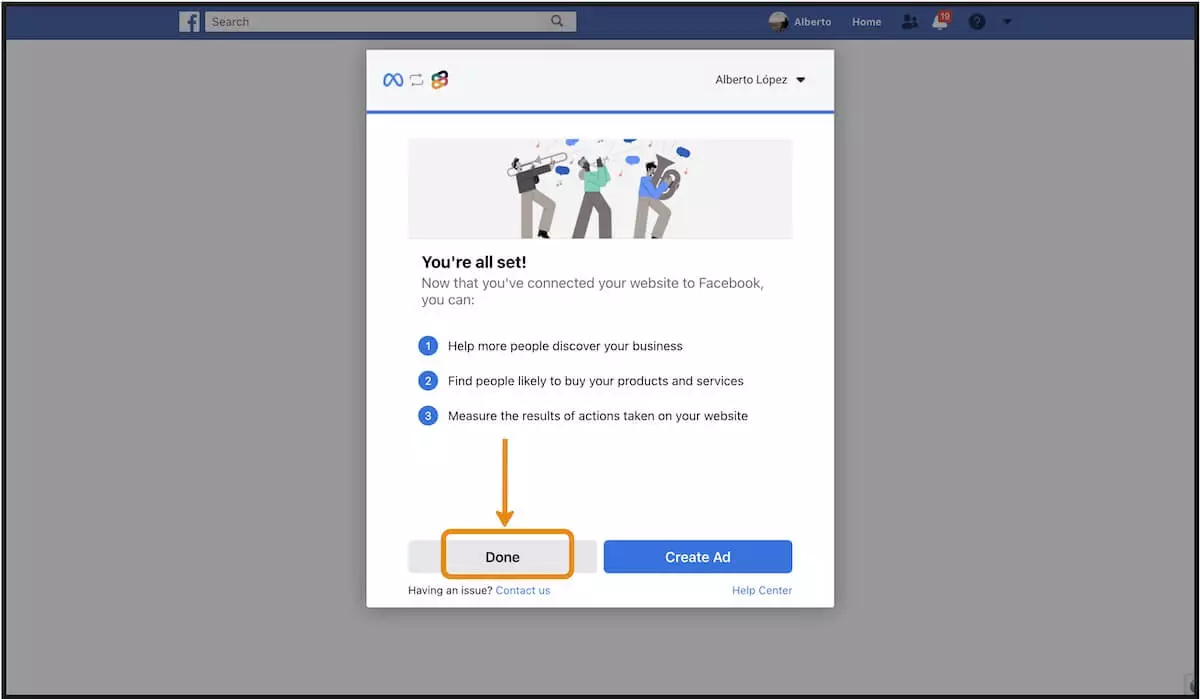

Step 10
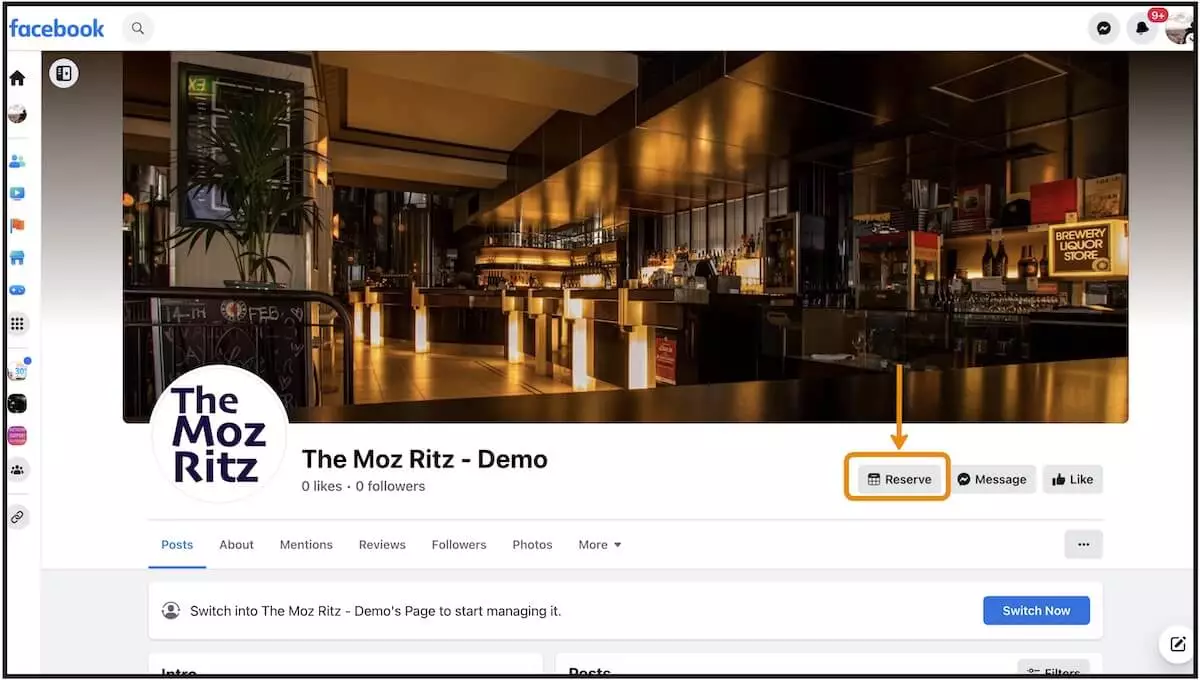
Congratulations, you are all set up! You can now see the ‘Reserve’ button on the restaurant’s Facebook page.

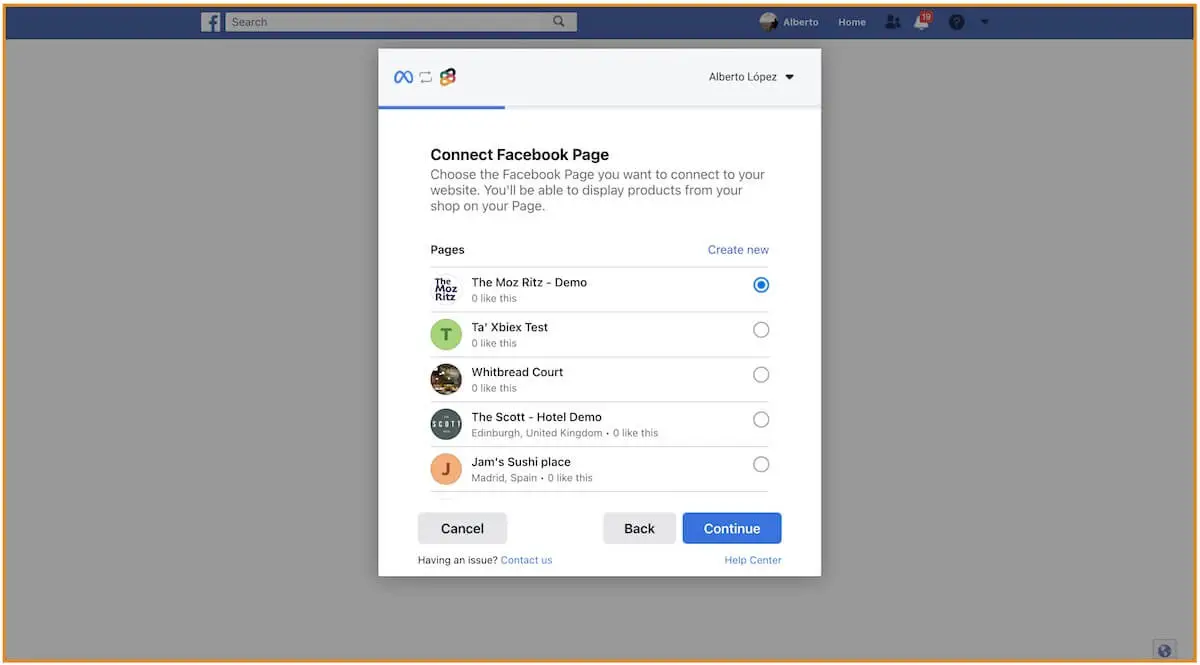
*Step 7.1
Select the preferred Facebook page (if you manage multiple pages).

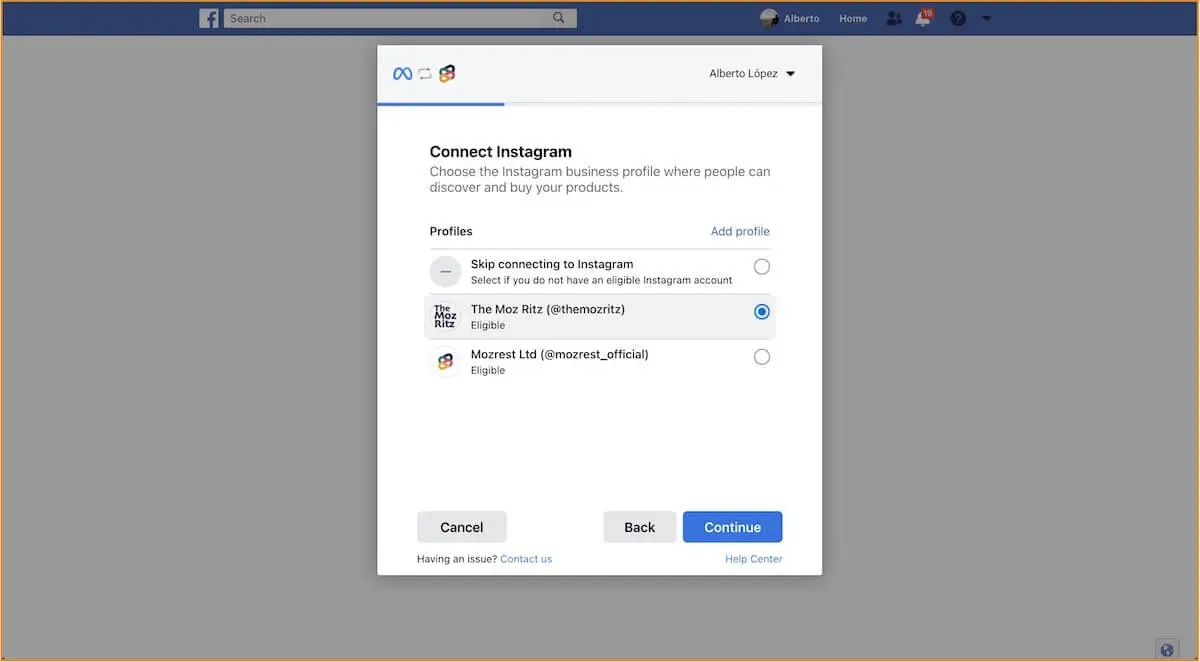
*Step 7.2
After clicking ‘Add Profile’, select the preferred Instagram page to install the ‘Reserve’ button on Instagram too.

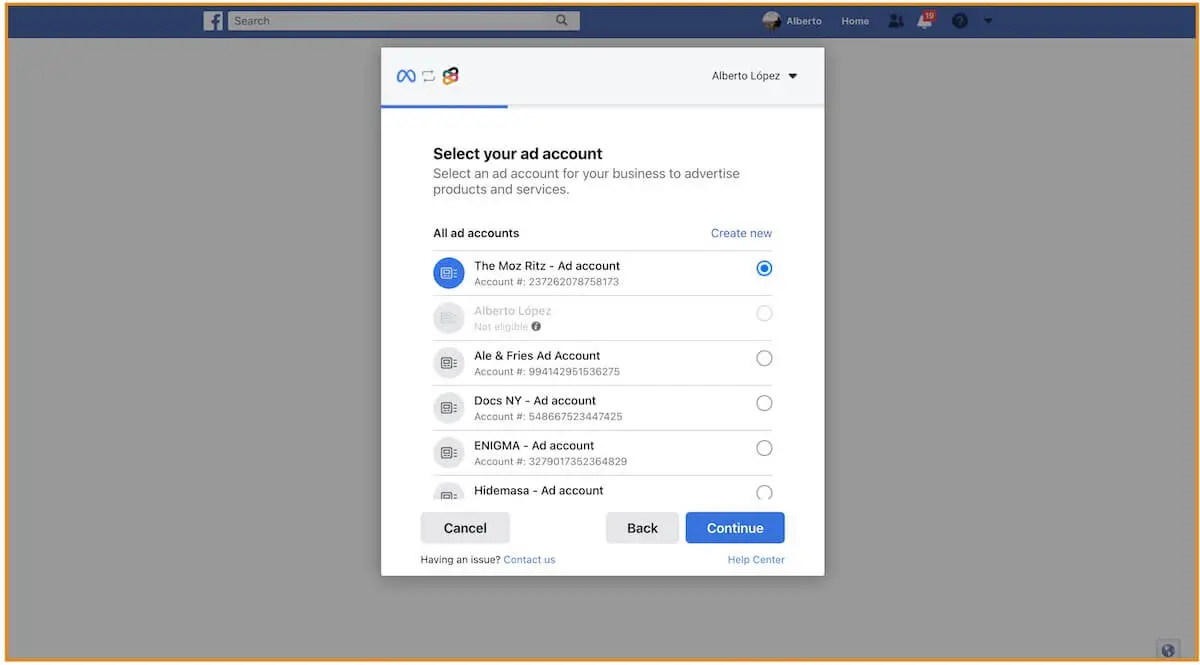
*Step 7.3
Select the preferred advertisement account.

*Step 7.4
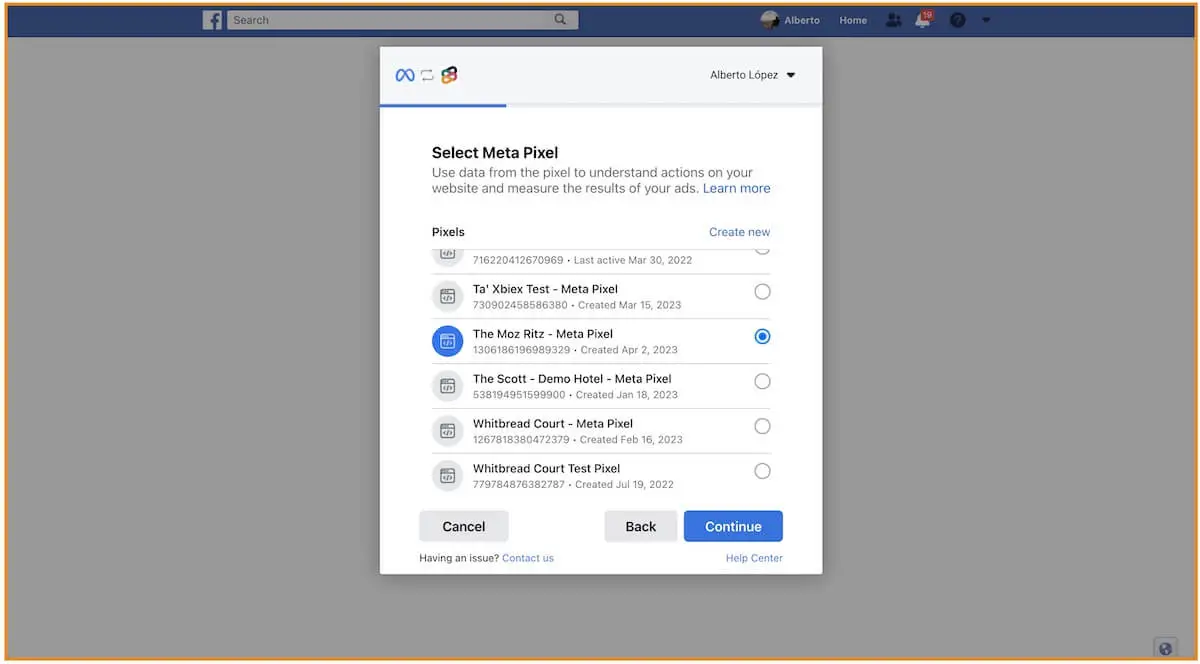
Select the preferred Meta pixel to use.

Guide #2 – From your restaurant’s Facebook page (12 steps)
Step 1
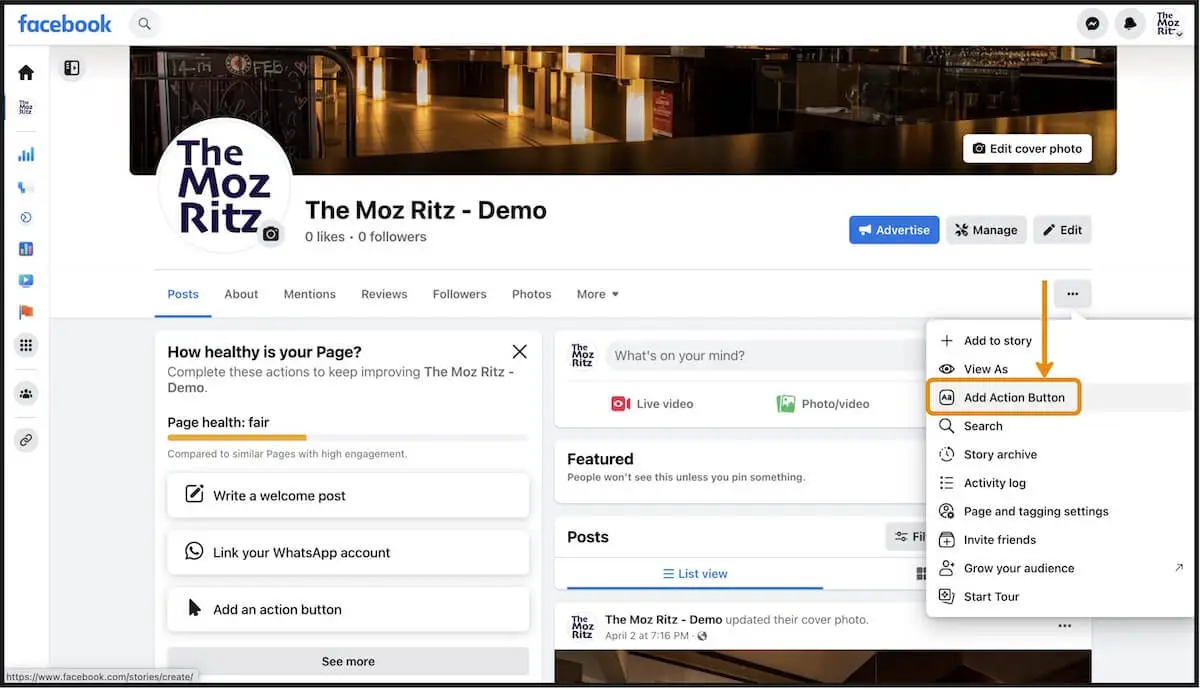
On your restaurant’s Facebook page, click on the three dots. Then, click ‘Add Action Button’.

Step 2
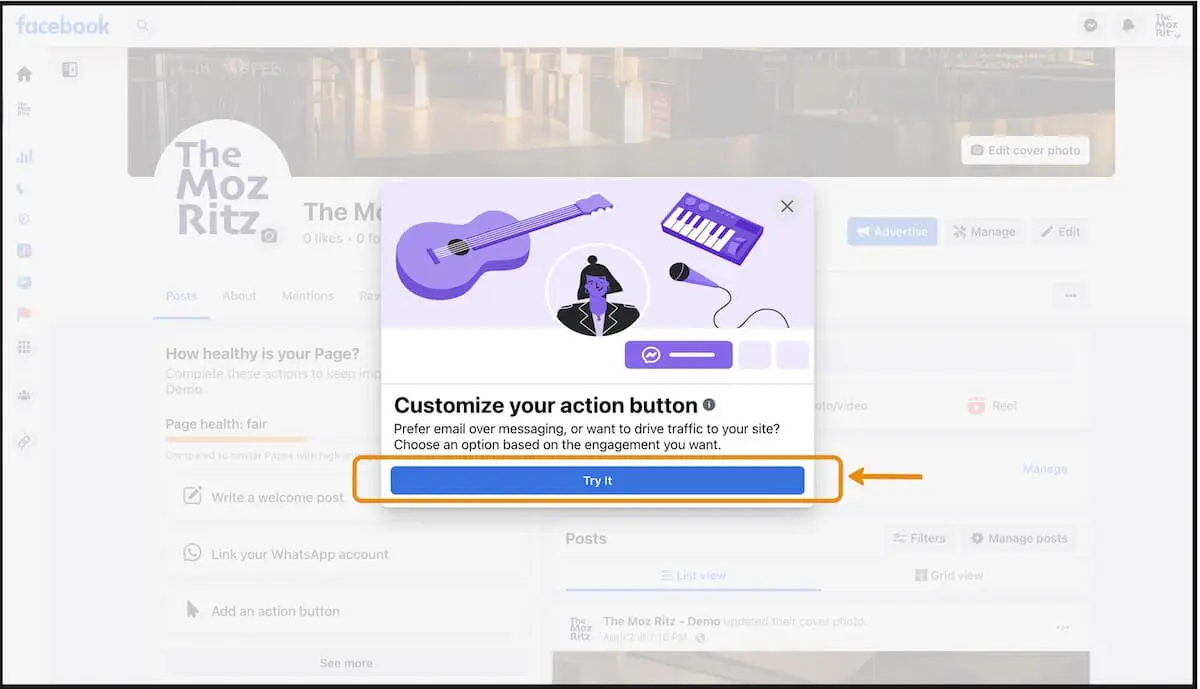
Click ‘Try It’ on the popup window that opens.

Step 3
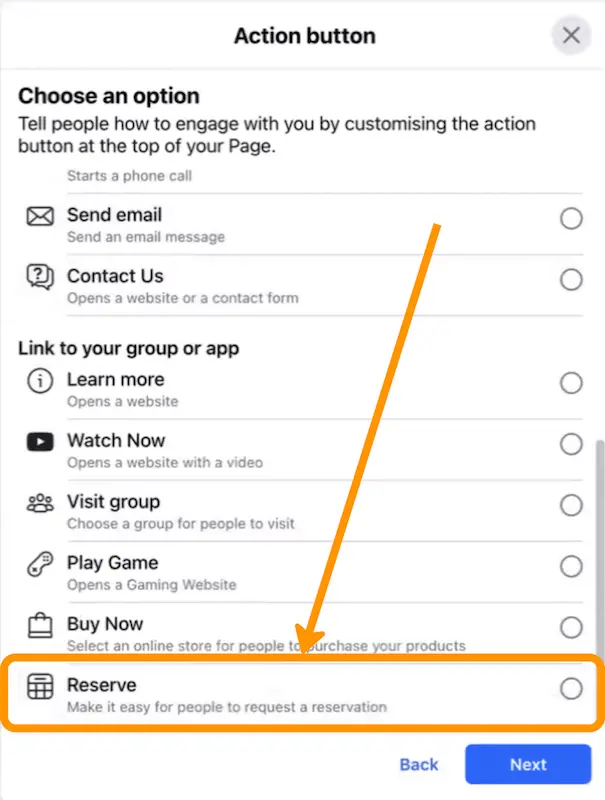
Choose ‘Reserve’ from the list of action buttons.

Step 4
Choose ‘Connect Another Tool’.
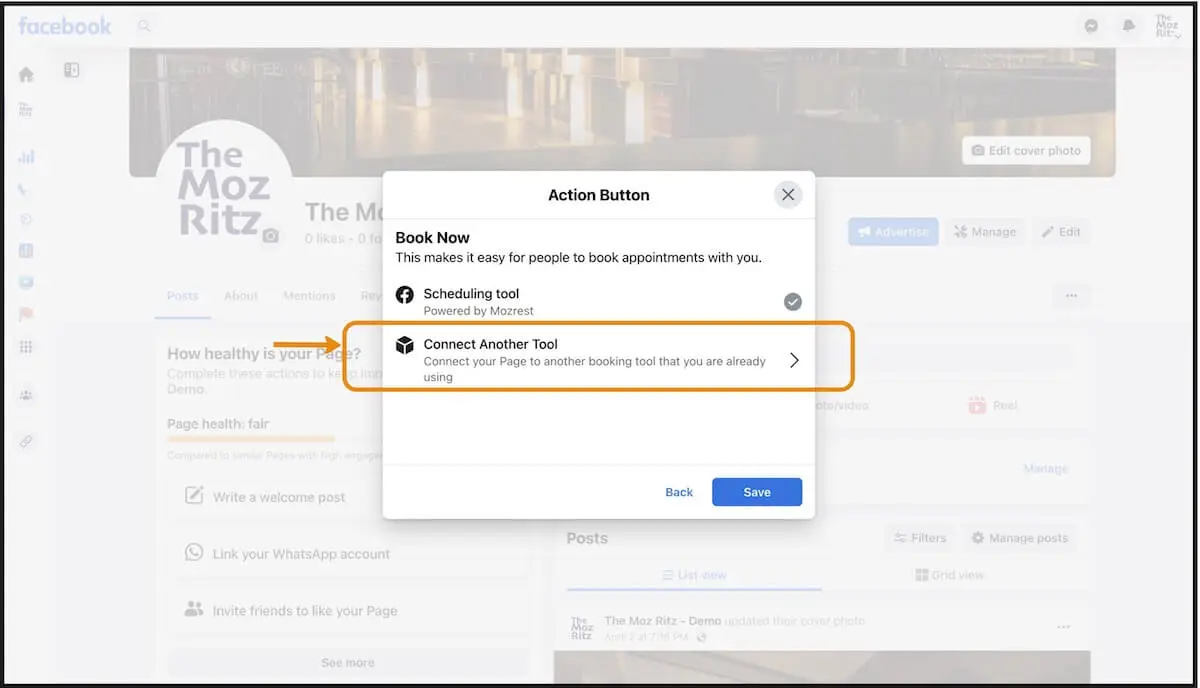

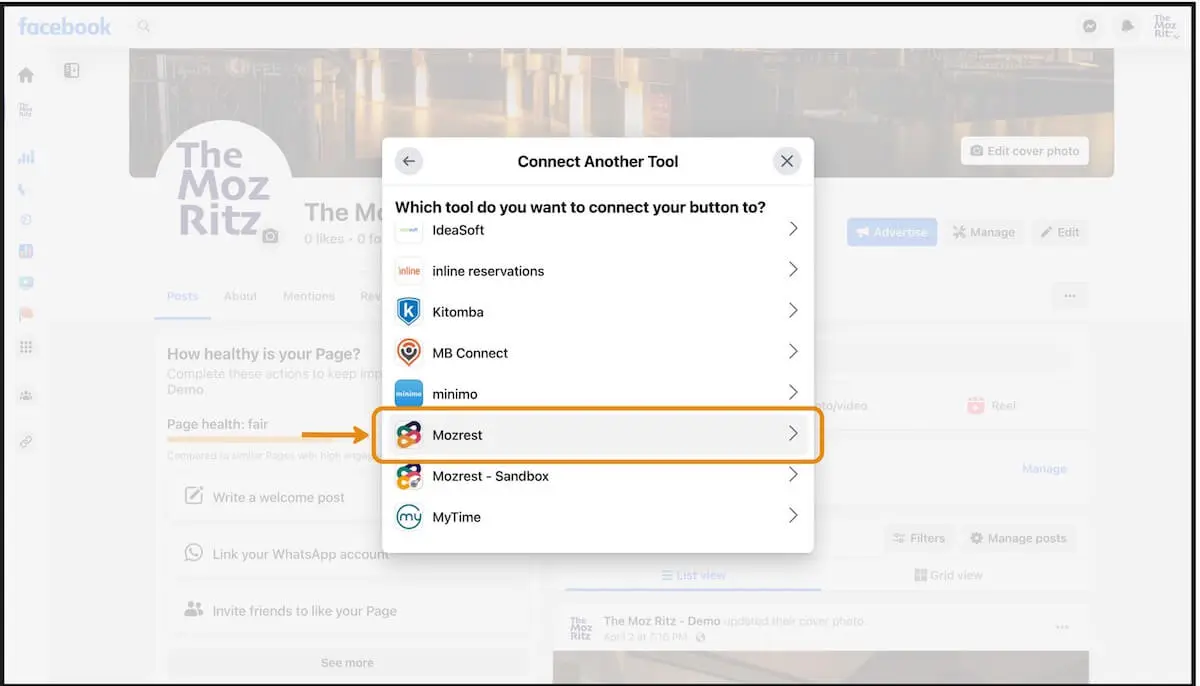
Step 5
Select ‘Mozrest’.

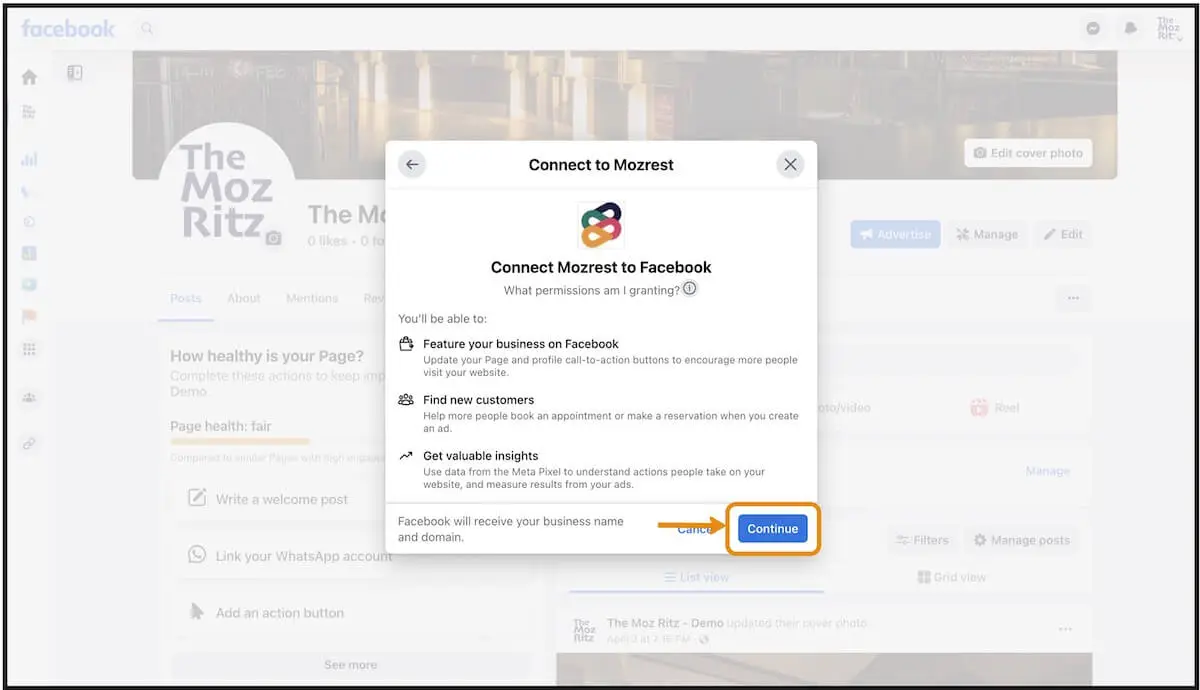
Step 6
Click ‘Continue’ to grant necessary permissions to Mozrest.

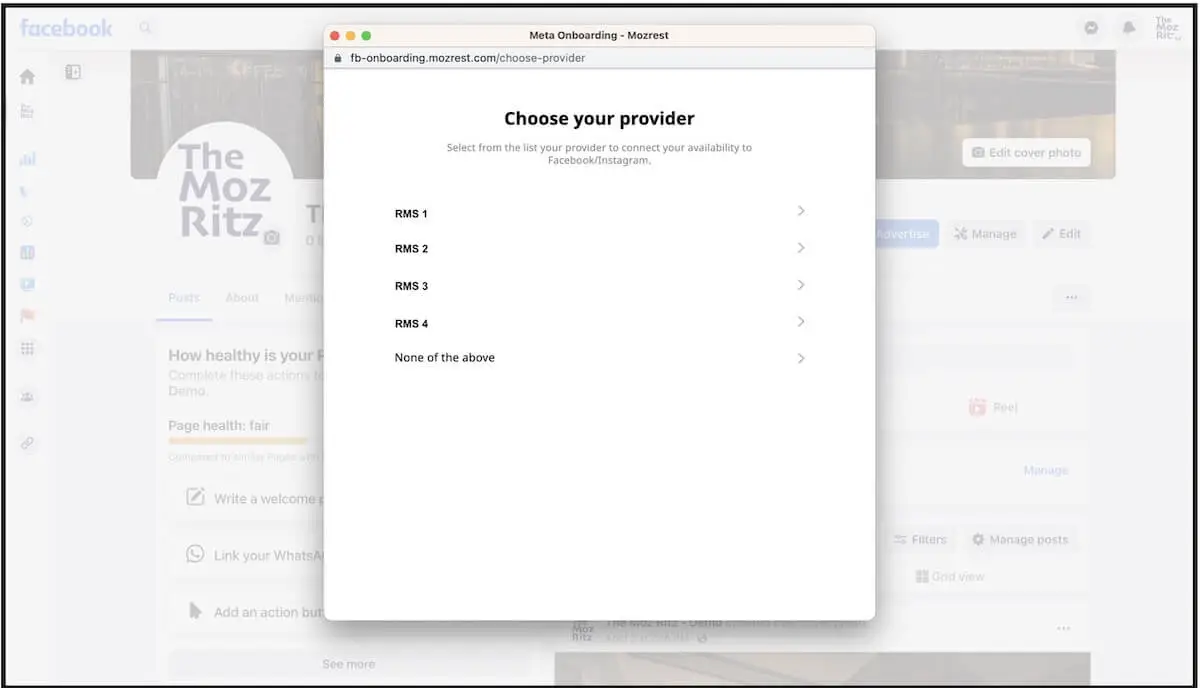
Step 7
Select your Reservation Management System to initiate the single sign-on process.

Step 8
Log in using your Reservation Management System login details to validate the connection to Facebook.
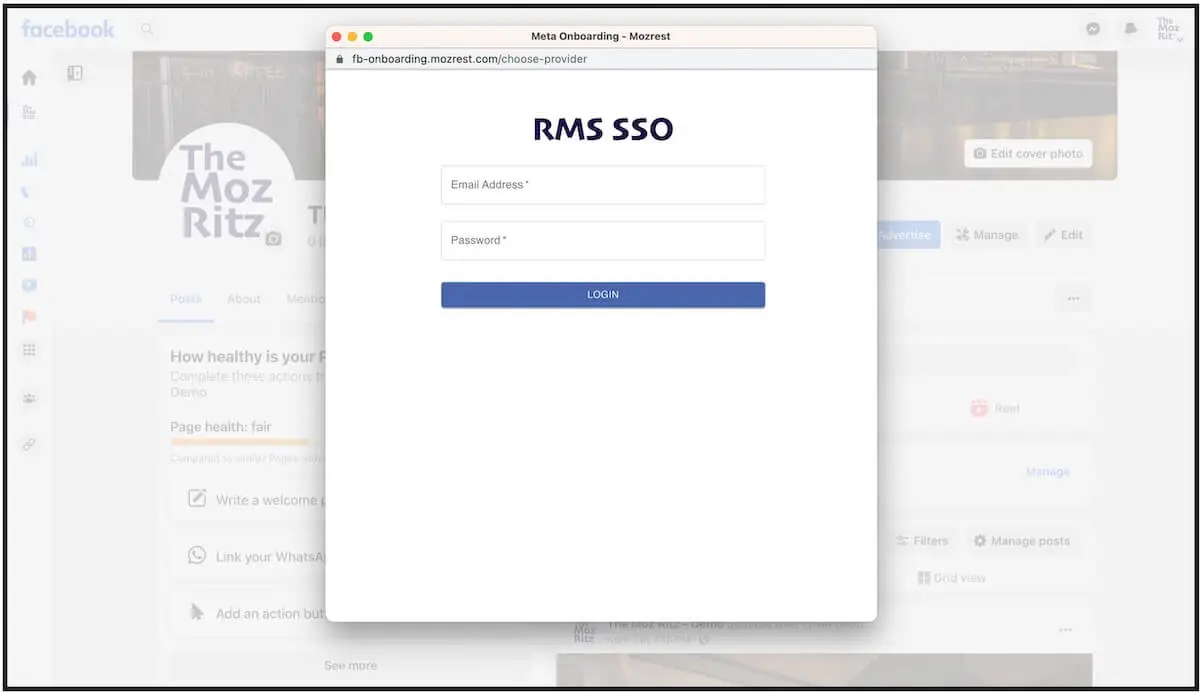

Step 9
Confirm the settings. Check steps 9.1-4* at the end of this section to change the account.
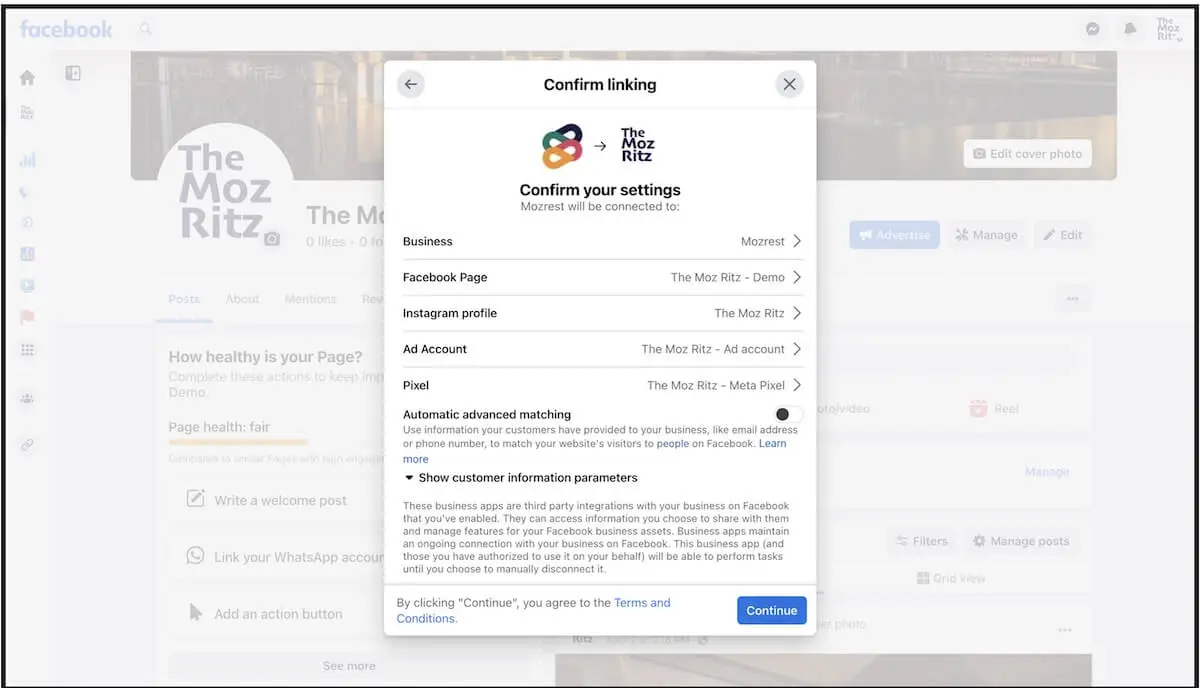

Step 10
Click ‘Continue’ to complete the integration.
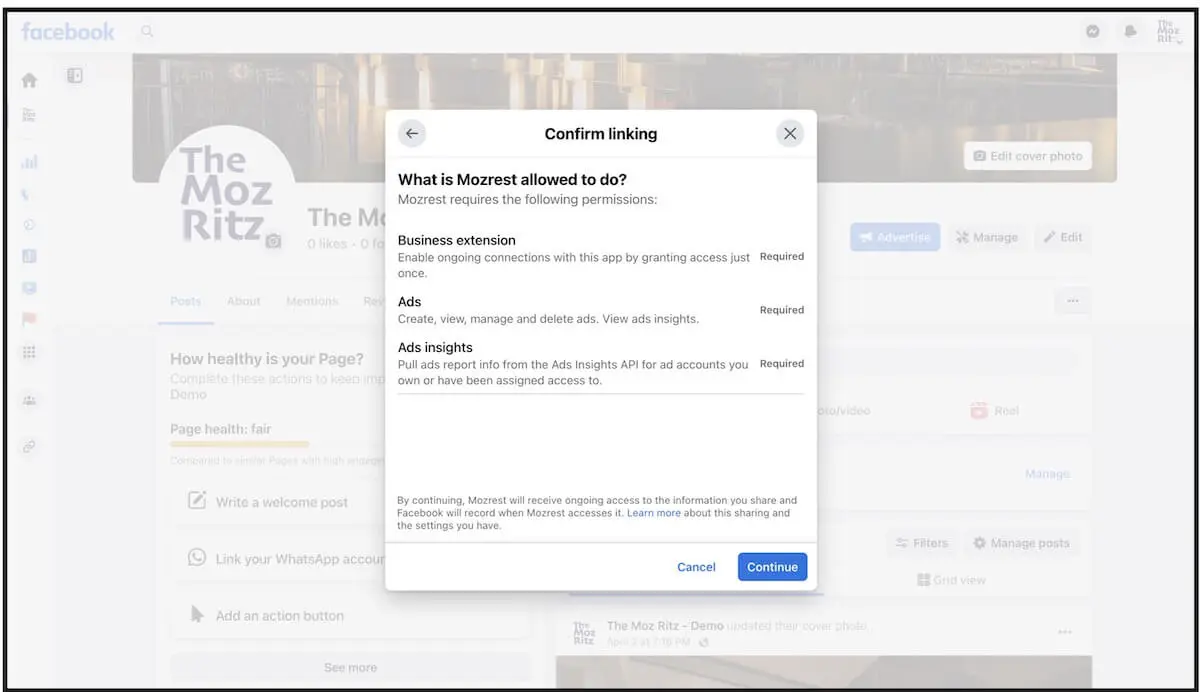

Step 11
Click ‘Done’.
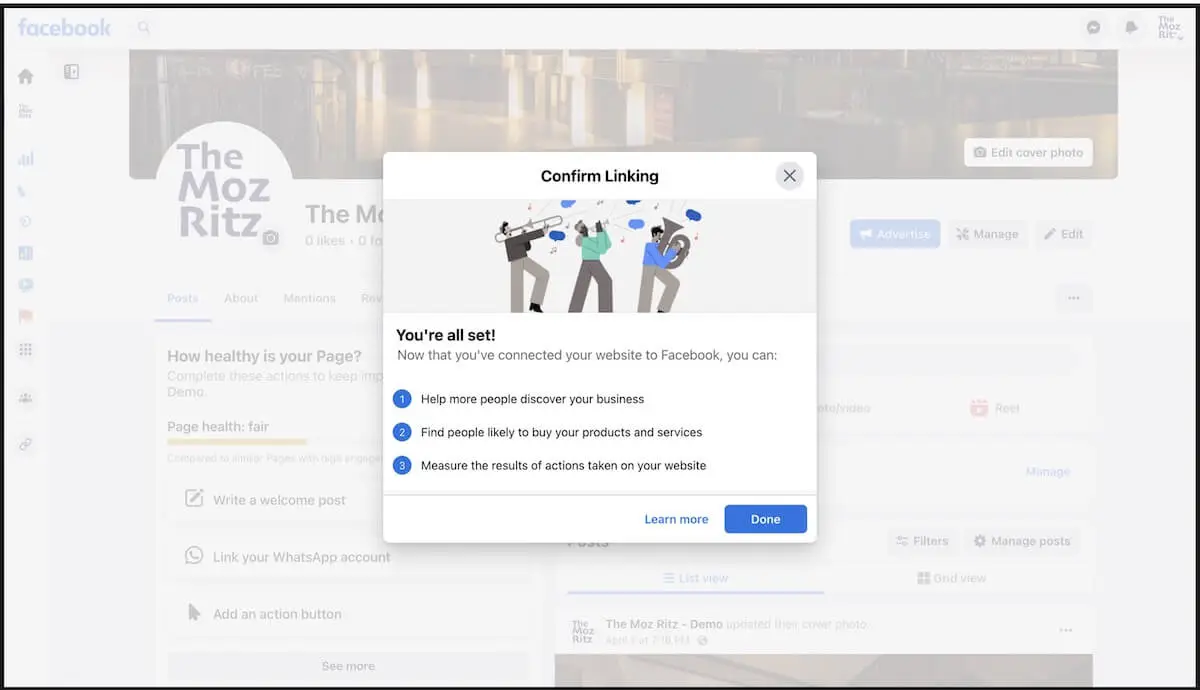

Step 12
Congratulations, you are all set up! You can now see the ‘Reserve’ button on the restaurant’s Facebook page.


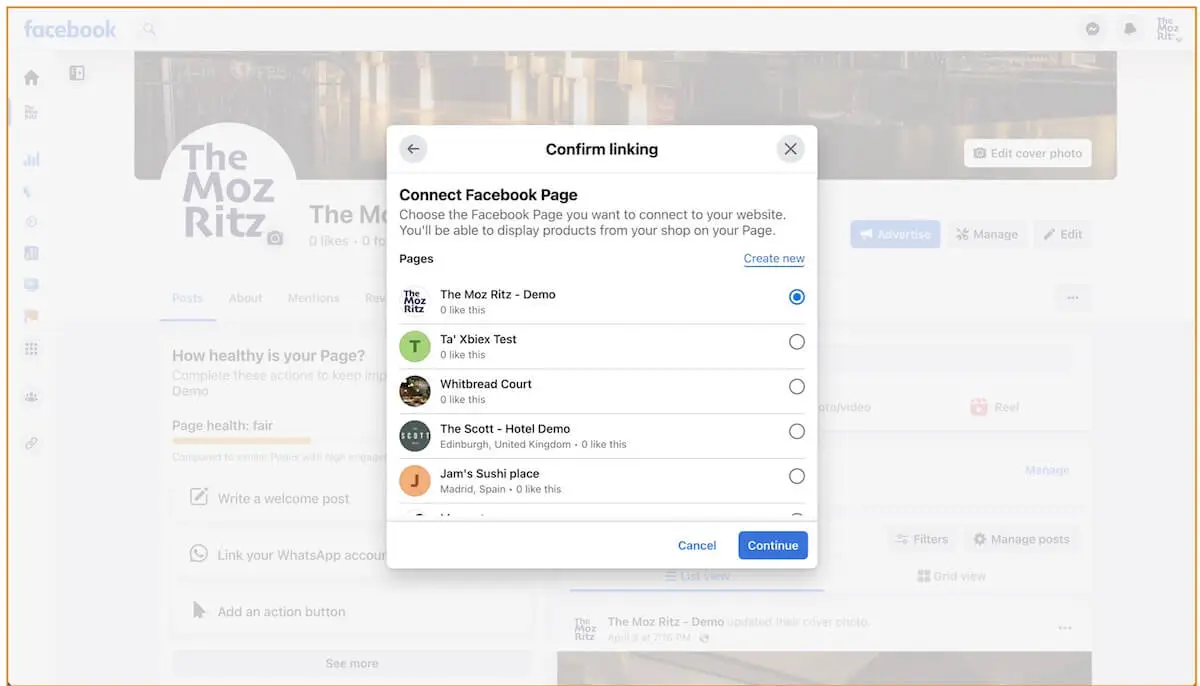
*Step 9.1
Select the preferred Facebook page (if you manage multiple pages).

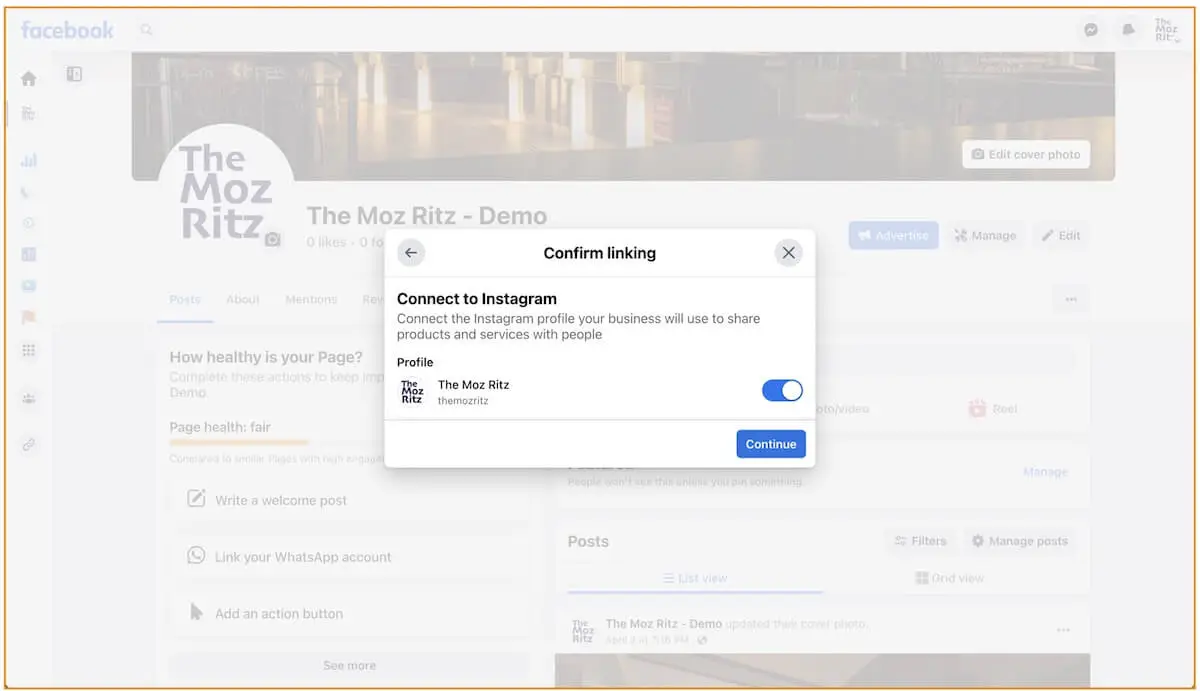
*Step 9.2
Select the preferred Instagram page to install the ‘Reserve’ button there too.

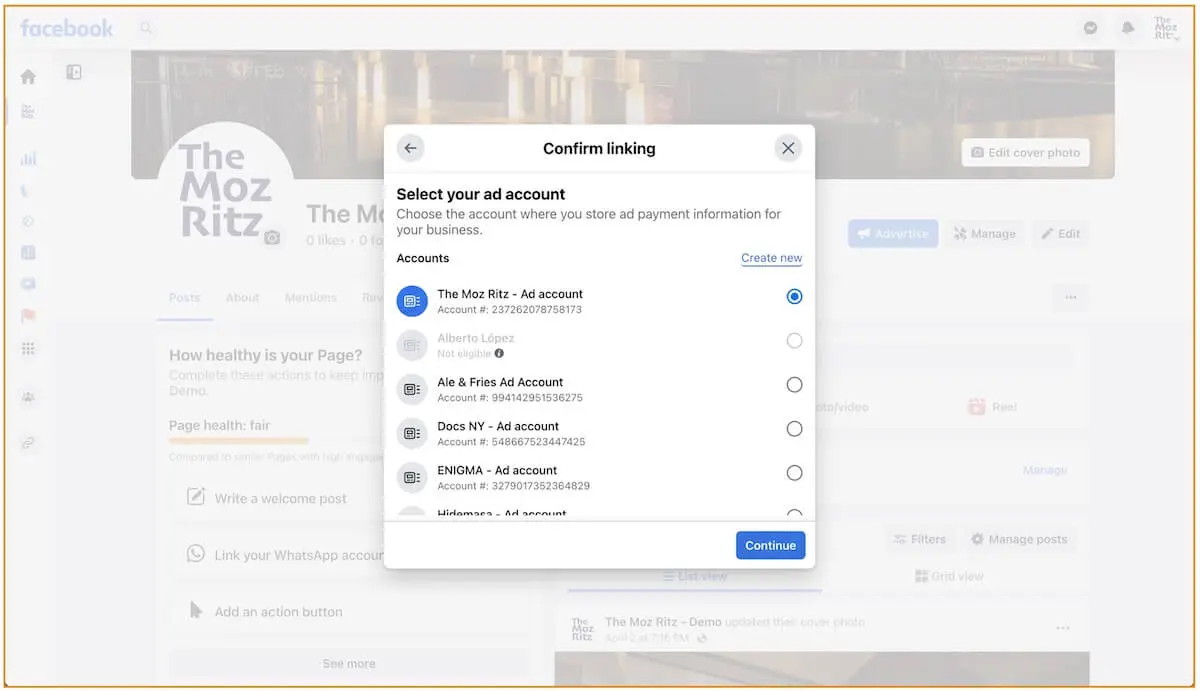
*Step 9.3
Select the preferred advertisement account.

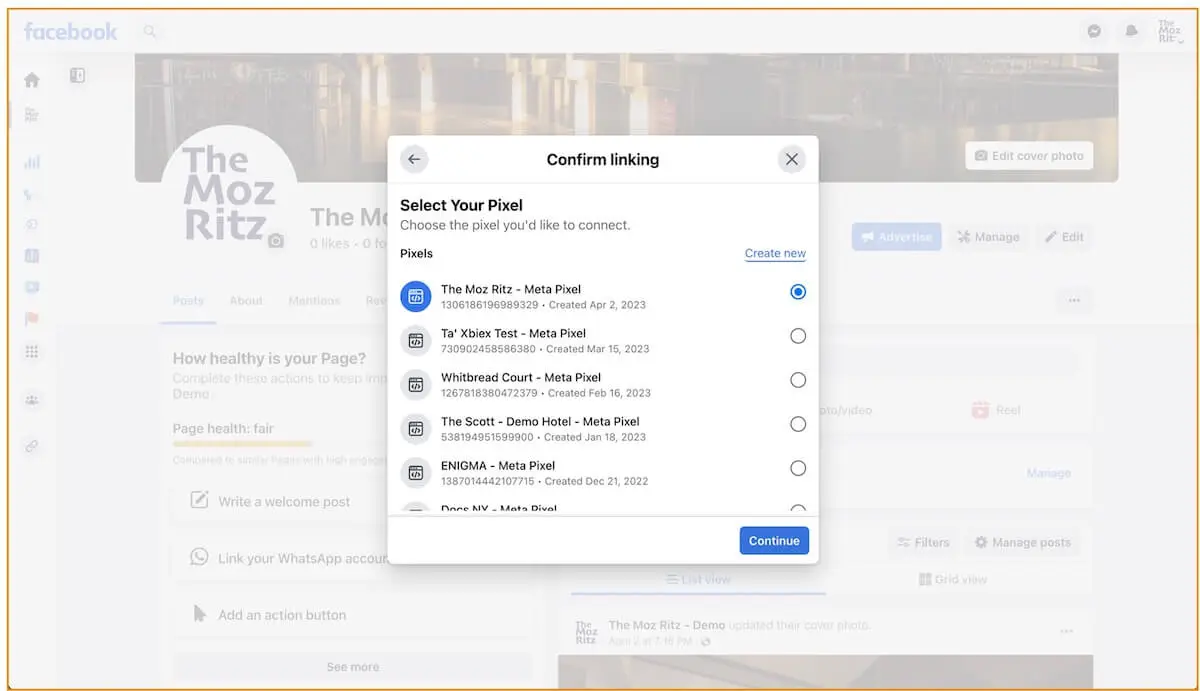
*Step 9.4
Select the preferred Meta pixel to use.

Guide #3 – From the Meta Business Suite (12 steps)
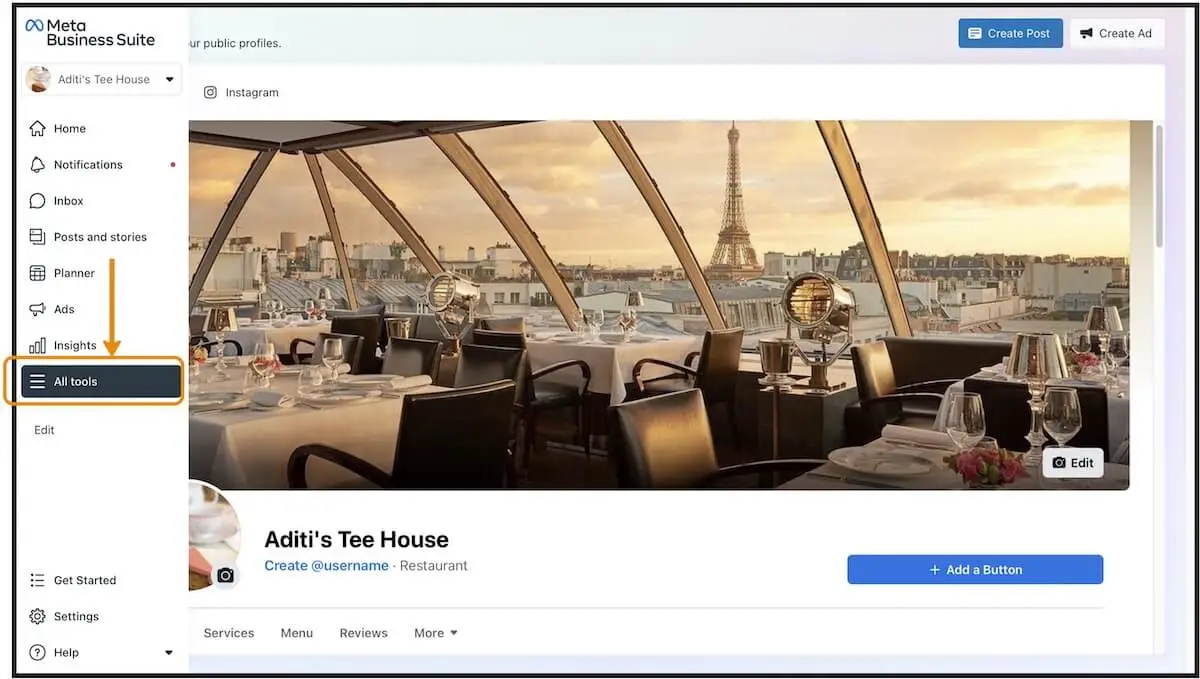
Step 1
On your venue’s Facebook page, open the side menu and click on ‘All Tools’.

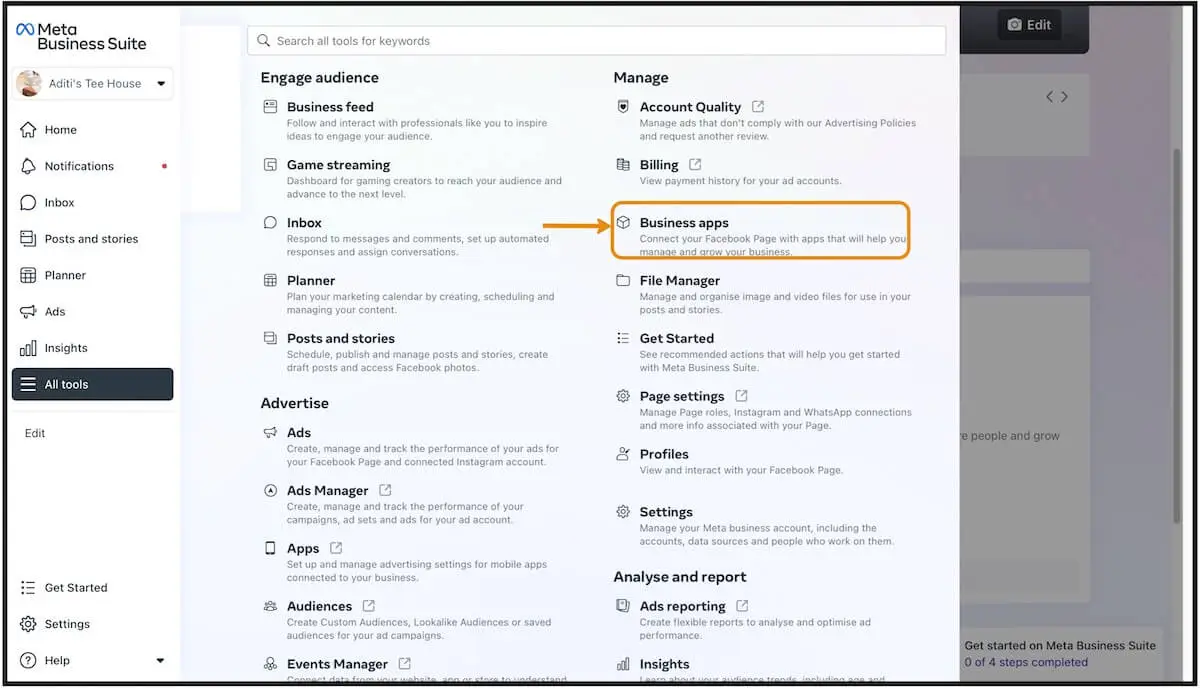
Step 2
Select ‘Business Apps’.

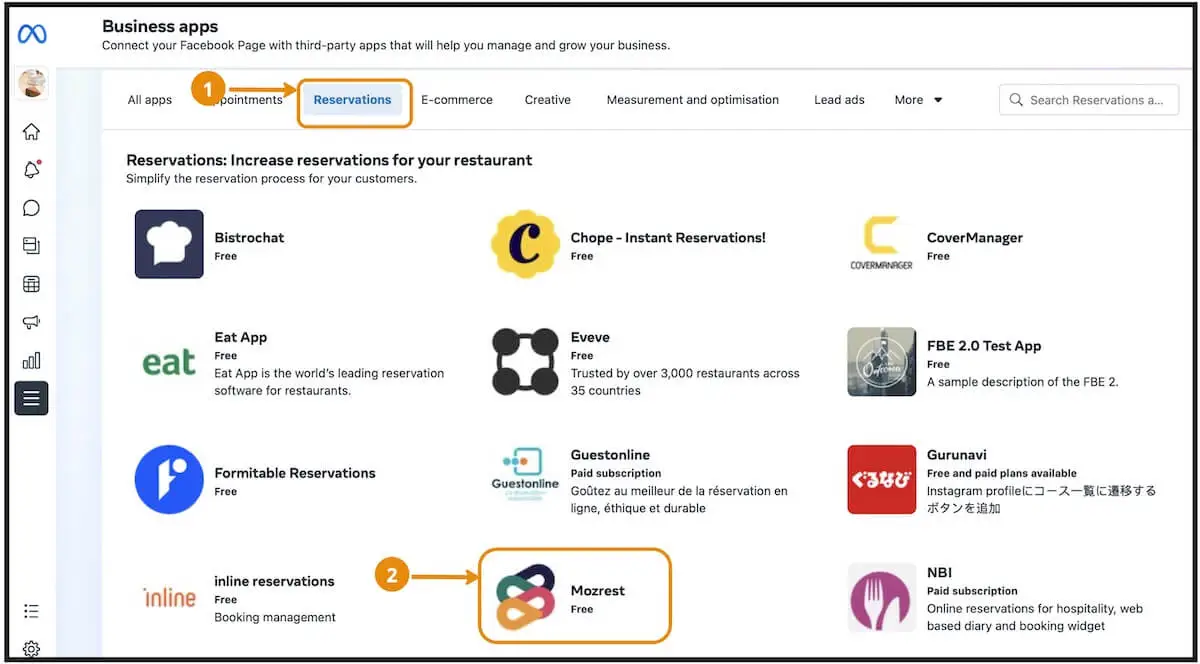
Step 3
Select the ‘Reservations’ tab and within it, select ‘Mozrest’.

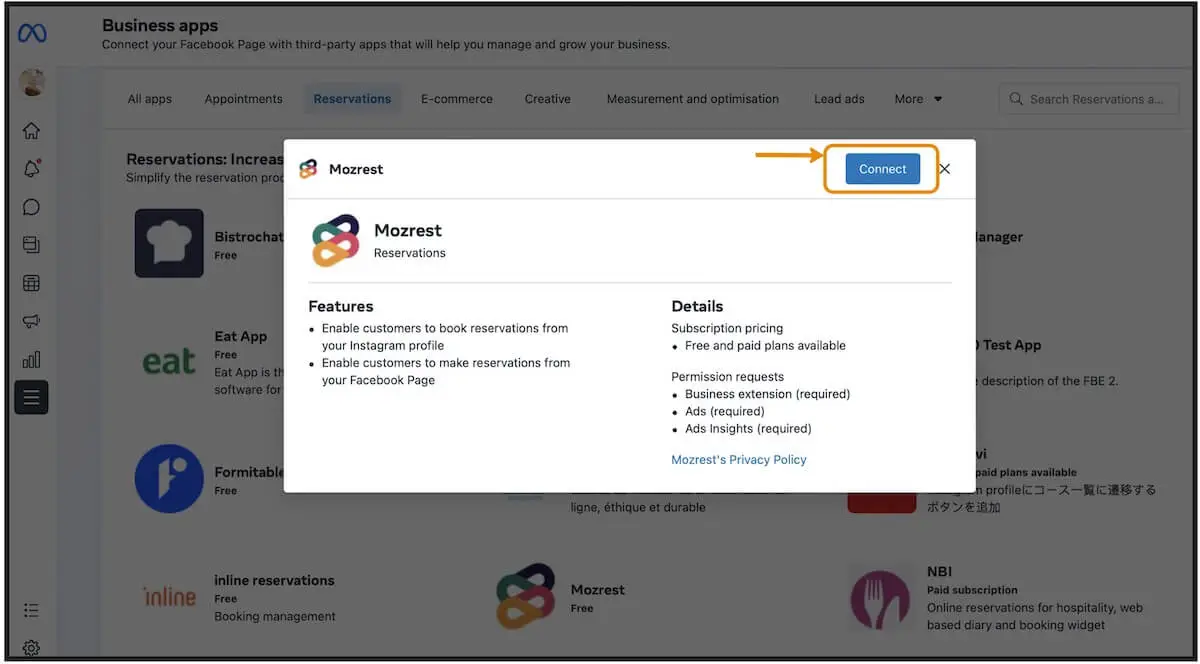
Step 4
Click on ‘Connect’.

Step 5
Click ‘Continue’ to grant necessary permissions to Mozrest.
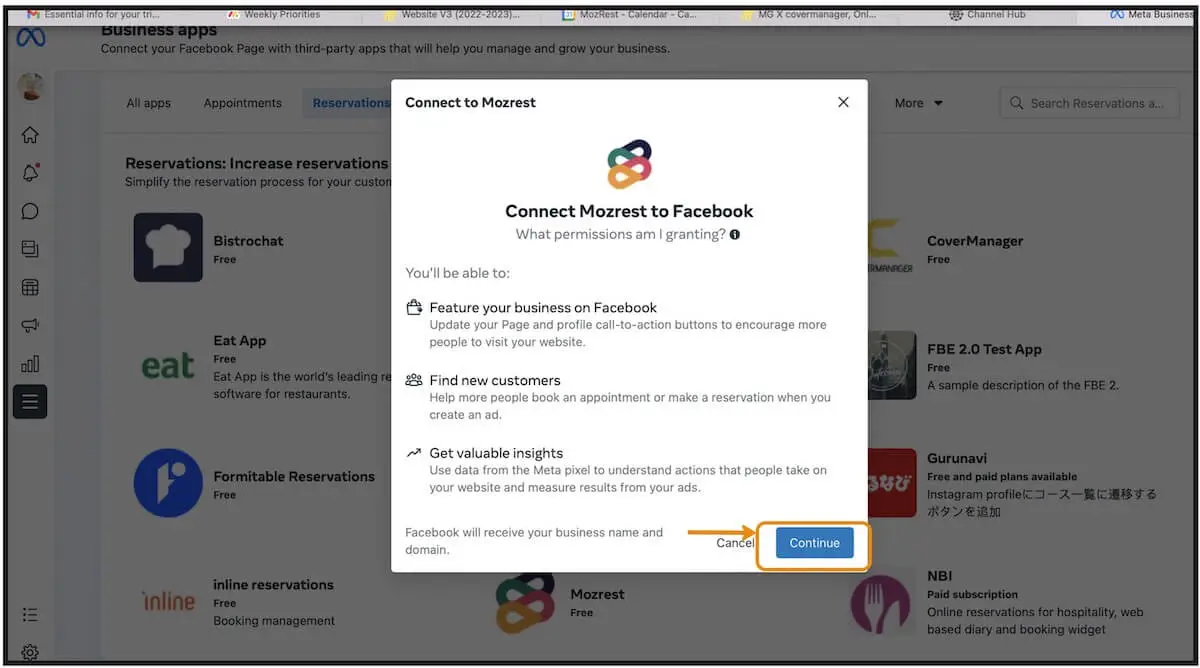

Step 6
Choose your specific Reservation Management System to initiate the single sign-on process.
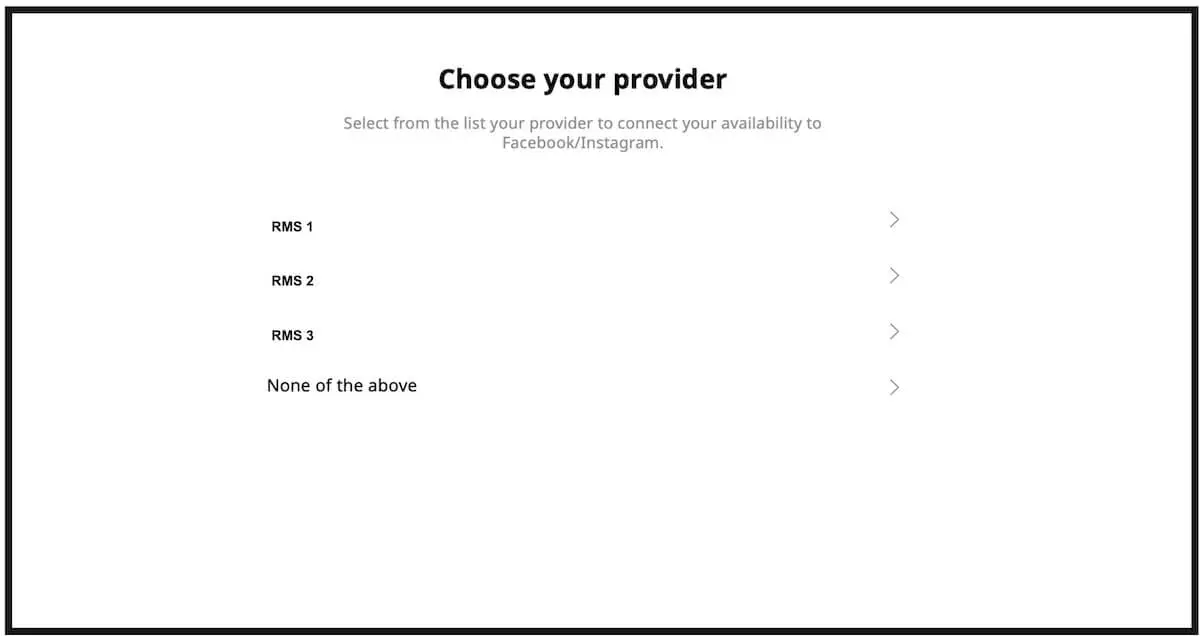

Step 7
Log in using your Reservation Management System login details to validate the connection to Facebook.
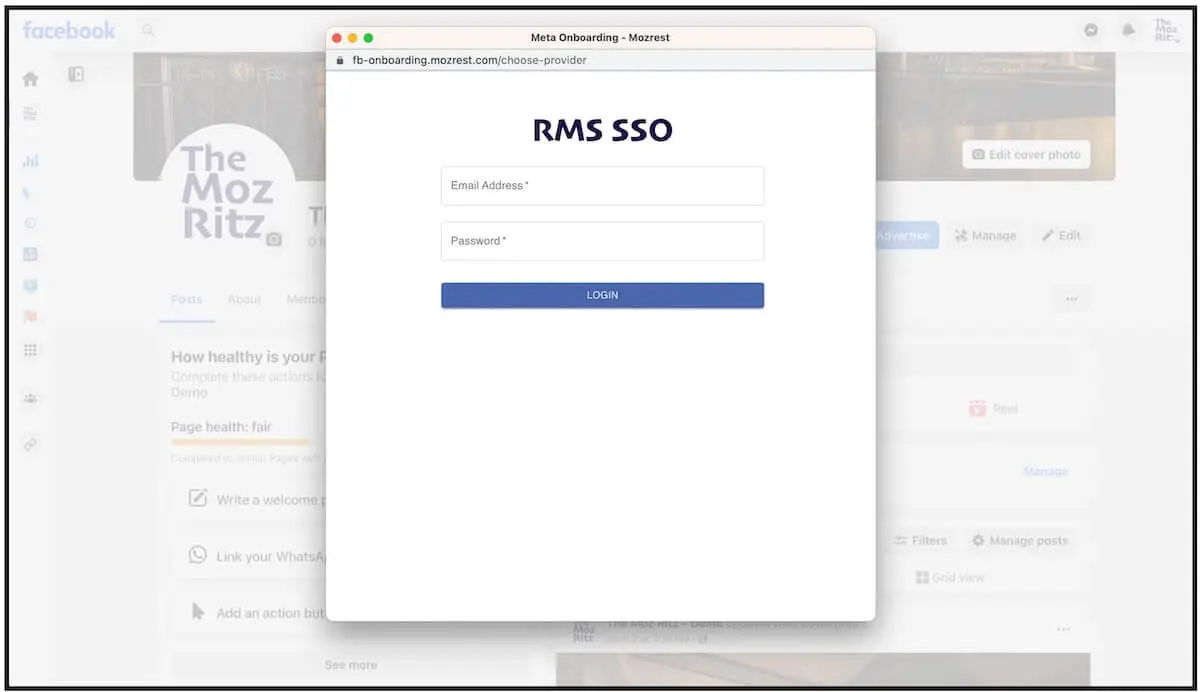

Step 8
Confirm the settings. Check steps 8.1-4* at the end of this section to change the account.
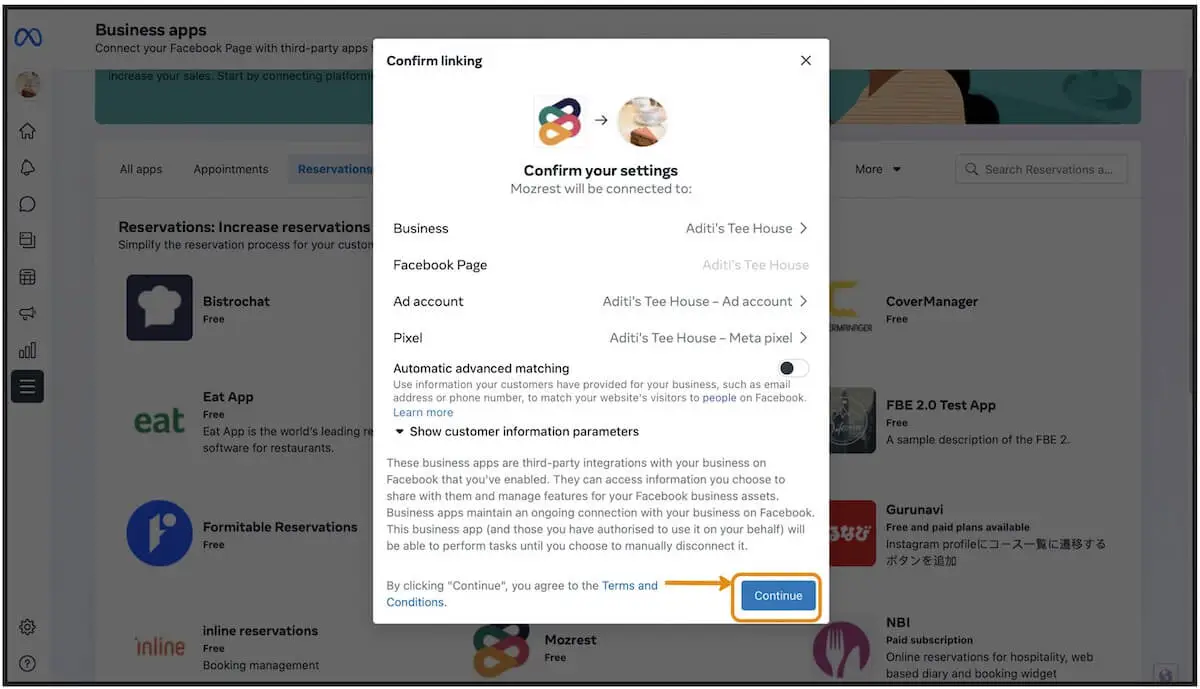

Step 9
Click ‘Continue’ to complete the integration.
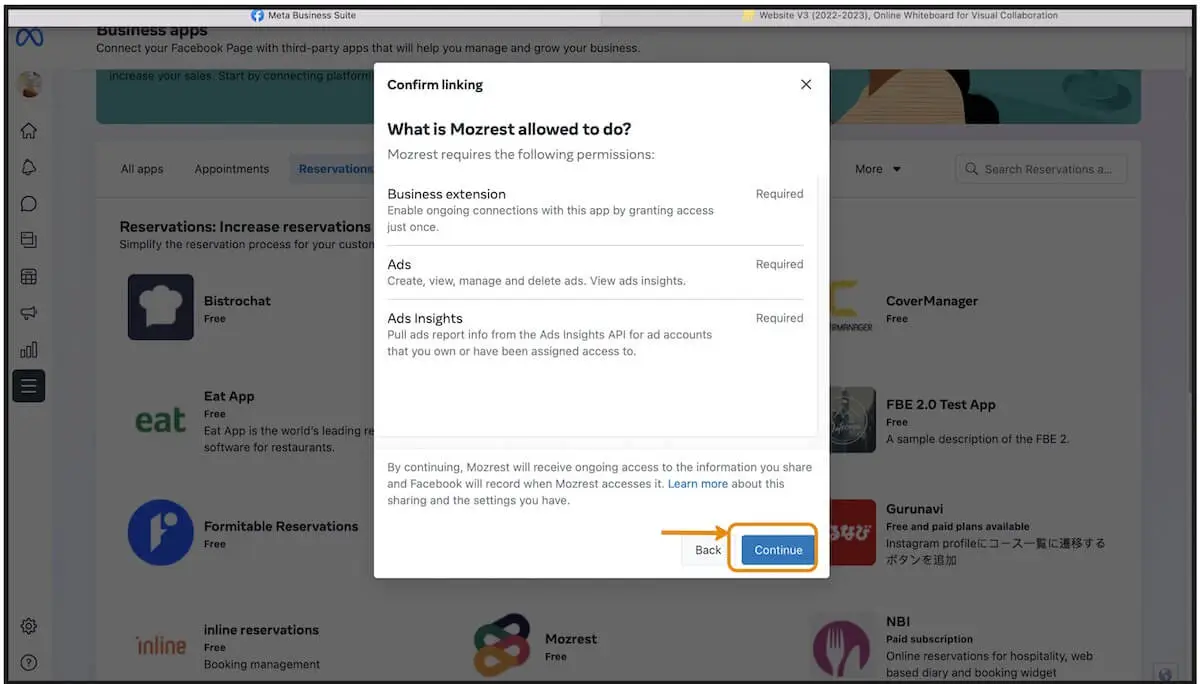

Step 10
Click ‘Done’.
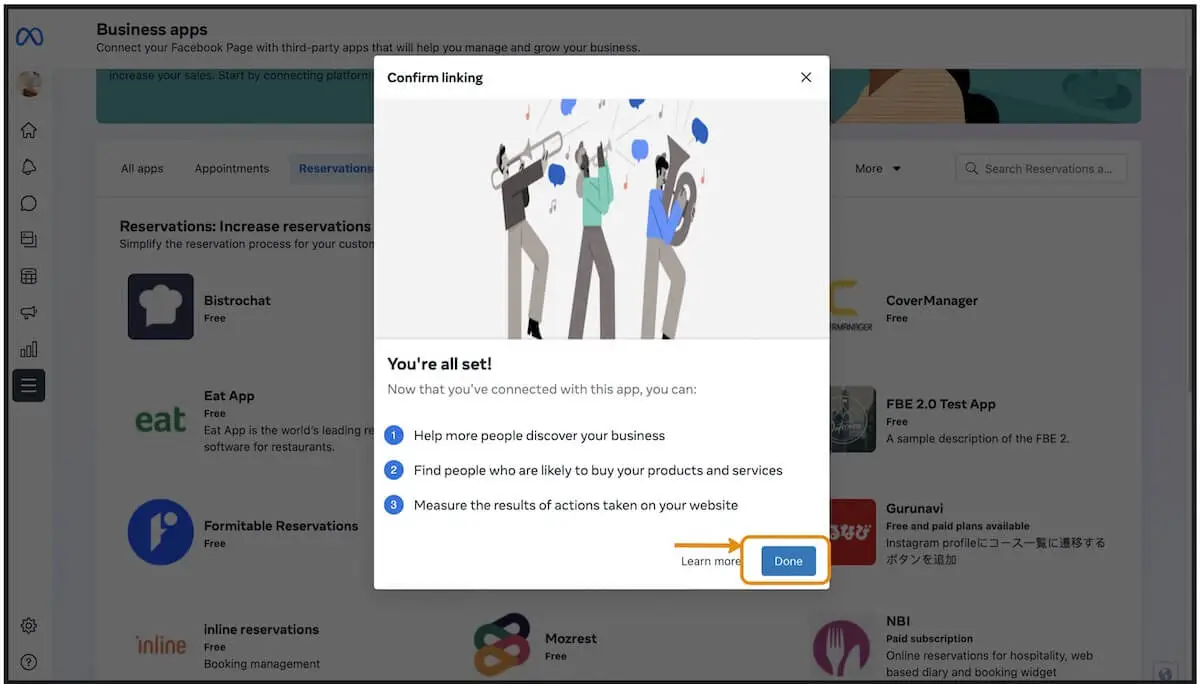

Step 11
Once successful, you will be able to see Mozrest in the ‘Connected Apps’ section.
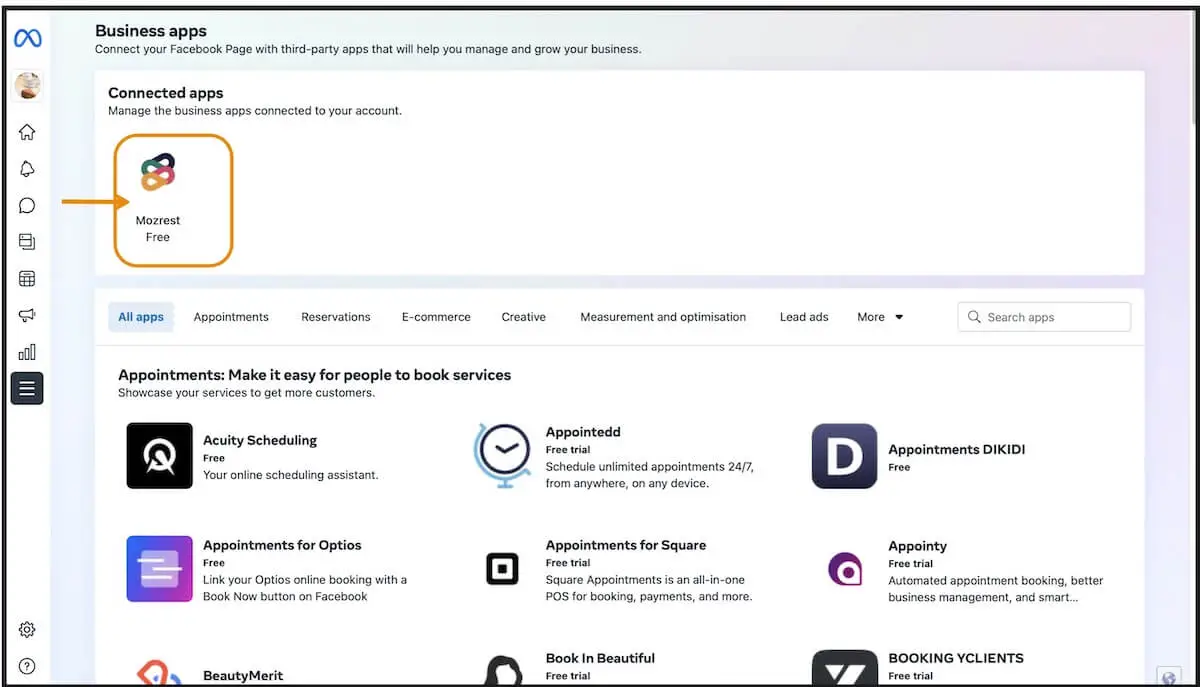

Step 12
You are all set up! You can now see the ‘Reserve’ button on the restaurant’s Facebook page.
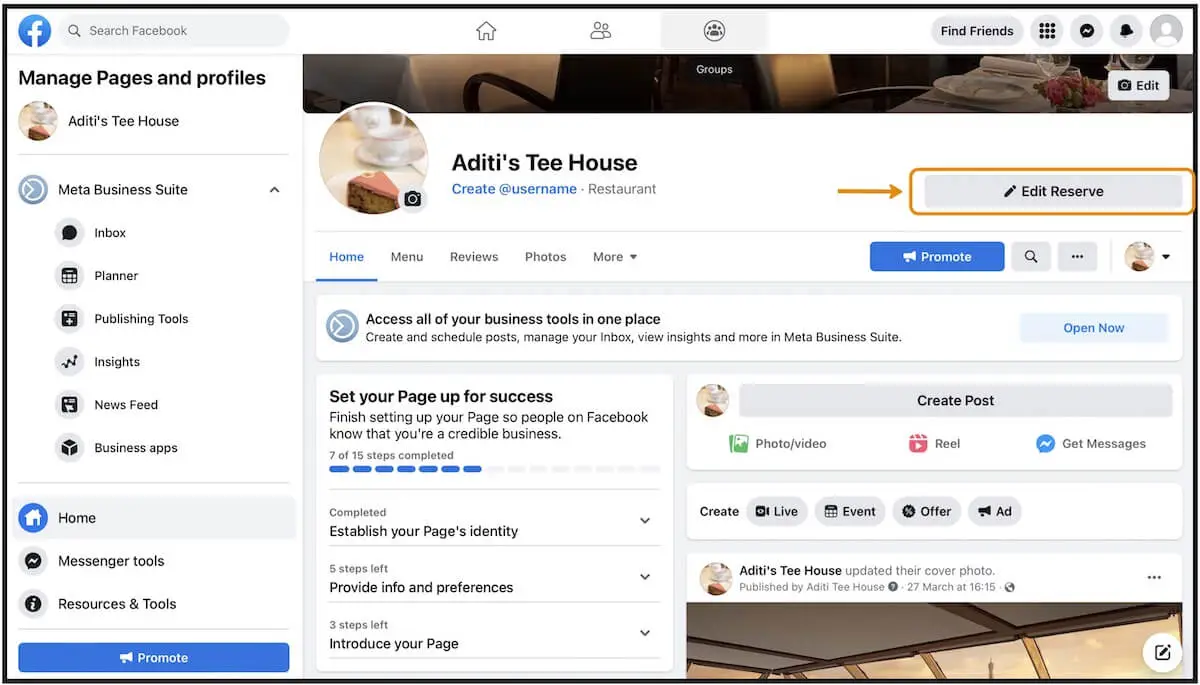

*Step 8.1
Select the preferred Facebook page (if you manage multiple pages).


*Step 8.2
Select the preferred Instagram page to install the ‘Reserve’ button there too.


*Step 8.3
Select the preferred advertisement account.


*Step 8.4
Select the preferred Meta pixel to use.


Contact us if you have any questions or need help adding the ‘Reserve’ button to your restaurant’s Facebook page. Our friendly team will be happy to assist!
